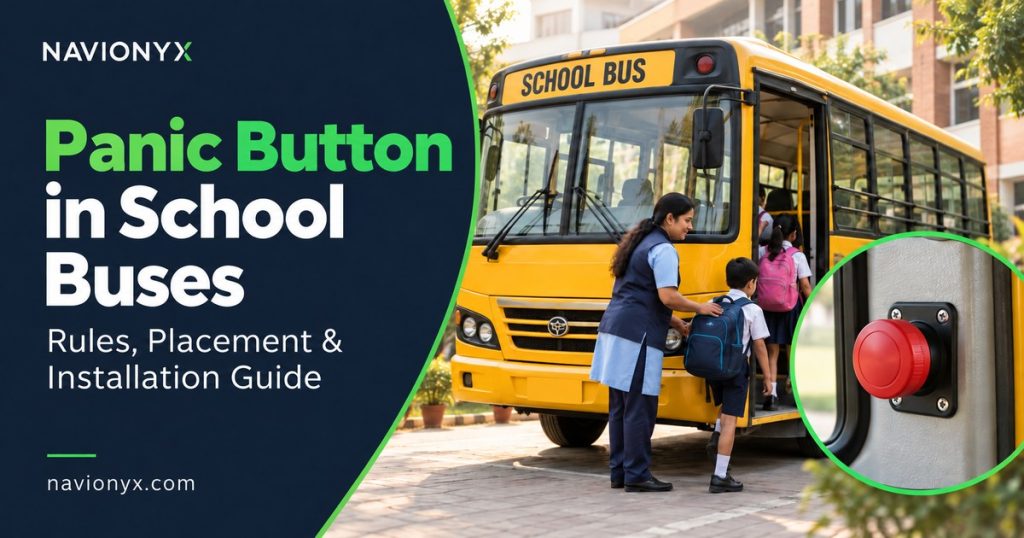
School Transport · Compliance Guide
What the law asks for, how many buttons a bus really needs, where each one should go, who gets the alert, and how a school can get every vehicle installed, certified and audit ready.
By Navionyx Team · October 2026 · 26 min read

A panic button in a school bus is a small thing to look at and a big thing to get right. It is the one device on the bus that lets a driver, an attendant or an older student raise an emergency alert without a phone call, without stopping to explain, and without knowing exactly where the bus is. If your school is planning panic button installation for school buses, this guide walks through the full picture: what Indian rules require, how many buttons a bus needs, where each button should be placed, what happens after someone presses it, and how to keep every vehicle compliant through the school year.
One idea runs through this entire article. In India, the panic button is not a separate gadget. It is the emergency input of the AIS 140 Vehicle Location Tracking Device (VLTD) that is installed in the bus. The button tells the tracking device that something is wrong, and the tracking device sends the alert with the bus location. A button that is not connected to a working, registered VLTD does nothing useful for a child and will not pass an RTO check. Keep that in mind and most of the confusion around school bus panic buttons disappears.
We wrote this guide for school transport managers, principals, trustees, contract bus and van owners, and parents who sit on school transport committees. It draws on central and state rules, published school transport guidelines, and what we see on the ground while installing and supporting AIS 140 devices for passenger fleets.
Key takeaways
✓ Rule 125H of the Central Motor Vehicles Rules requires a vehicle location tracking device with one or more emergency buttons in public service vehicles. Hired school buses and vans running on contract permits fall squarely inside it.
✓ States are going further. Maharashtra’s amended school bus rules, notified in July 2026, require a VLTD with a panic button in every school transport vehicle.
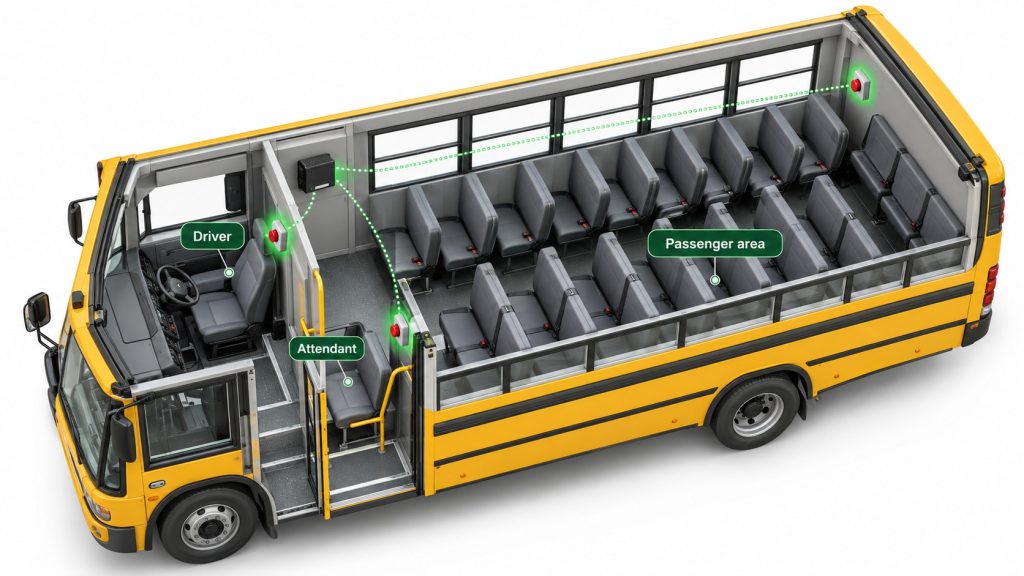
✓ The law sets a minimum of one button. A sensible school bus layout is one for the driver, one for the attendant, and one or more in the passenger area on longer buses.
✓ An alert is only as good as the response behind it. Every school needs a written plan for who acts when a button is pressed.
✓ A certificate on file is not enough. An inactive device fails the fitness check and, worse, fails the child on the day it is needed.
Why School Buses Need a Panic Button More Than Most Vehicles
Every public passenger vehicle in India is expected to carry an emergency button, so it is fair to ask why school buses deserve their own guide. The answer lies in who is sitting in the seats.
Adult passengers in a taxi or a city bus can usually help themselves. They carry phones, they know roughly where they are, and they can describe the problem to a helpline. A school bus carries the opposite group. Many schools do not allow young children to carry phones. A six year old cannot tell a control room which highway the bus is on. A teenager may have a phone but freeze when something frightening happens. On a school bus, the people least able to call for help are the people the bus exists to protect.
The adults on board have their own blind spots. The driver may be the person who needs help, after a sudden illness at the wheel or an accident that leaves him injured. The attendant may be busy managing thirty children during a breakdown on an isolated stretch of road, with no free hand for a long phone call. A button that sends the location automatically turns a complicated emergency into a single action.
The emergencies a school bus actually faces
When schools think about a panic button, they often picture a dramatic event like an abduction. Those cases are rare. The day to day emergencies on school routes are more ordinary and far more common:
✓ A medical event on board. A child has an asthma attack, a seizure, a severe allergic reaction or a fall inside the moving bus.
✓ A driver who becomes unwell. Chest pain, dizziness or a fainting spell at the wheel, where the attendant needs help immediately and may not know the location.
✓ A road accident or near miss. Even a minor collision with a bus full of children needs the school, parents and sometimes police and ambulance informed quickly.
✓ A breakdown in an unsafe place. A stalled bus on a highway shoulder, a dark stretch in the evening, or a flooded underpass during the monsoon.
✓ Harassment or a threat. An unauthorised person trying to board, a road rage incident, or misconduct by someone on the bus.
✓ A driver who should not be driving. An attendant who suspects the driver is impaired has very few options. A silent alert to the school is one of them.
The wider road safety picture explains why regulators keep tightening school transport rules. According to the Ministry of Road Transport and Highways, 9,528 people under the age of 18 were killed in road crashes in India in 2022, a sharp rise from 7,764 the year before. Not all of these involve school transport, but they show why response time matters whenever children are on the road. A panic button does not prevent a crash. What it does is cut the minutes between something going wrong and the right people knowing exactly where to go.
What the Rules Say About a Panic Button in a School Bus
School bus panic button rules in India come from three layers: the central motor vehicle rules, state transport rules and orders, and education board guidelines. Each layer adds something, and a school needs to satisfy all three that apply to it.
Layer 1: Rule 125H of the Central Motor Vehicles Rules
The central requirement sits in Rule 125H of the Central Motor Vehicles Rules, 1989. It was inserted by notification G.S.R. 1095(E) dated 28 November 2016, which, mandated a vehicle location tracking device and one or more emergency buttons in public service vehicles, with exemptions for two wheelers, three wheelers, e rickshaws and transport vehicles that need no permit.
Implementation was delayed because states did not yet have control rooms to receive the alerts. In October 2018 the ministry issued the Motor Vehicles (Vehicle Location Tracking Device and Emergency Button) Order, 2018, and fixed the start date. New public service vehicles registered on and after 1 January 2019 must carry the device and buttons, while states notify the deadline for older vehicles. The same order asks states to check the fitment and working status of the device when the vehicle comes in for its fitness certificate.
The order also places a continuing duty on the owner. Owners must make sure the installed device stays in working condition and keeps sending data to the backend over the mobile network. In plain words, a device that was fitted once and then went silent does not meet the rule. If you want a broader walkthrough of the standard itself, our plain language guide to AIS 140 compliance covers it in detail.
Which school vehicles does the central rule cover?
This is where many schools get confused, so it is worth being precise. Rule 125H is written around public service vehicles, which broadly means vehicles that carry passengers for hire or reward. How a school vehicle is registered decides how the rule reaches it.
✓ Buses and vans hired from a contractor usually run on contract carriage permits. They are public service vehicles, and Rule 125H applies to them directly.
✓ Vans run by individual owners who collect fees from parents are carrying children for reward. They need the appropriate permit, and once permitted, the VLTD and panic button requirement follows.
✓ Buses owned by the school itself are typically registered as educational institution buses. Here the strongest requirement usually comes from state school bus rules, which increasingly require a VLTD with a panic button for every school transport vehicle regardless of ownership.
✓ Auto rickshaws used for school runs are outside the central rule. Some cities regulate them separately, and schools should check local orders before treating them as exempt.
Our practical advice is simple. Do not build your compliance plan around finding the one vehicle category that might be exempt. Treat a working VLTD with a panic button as a requirement for every vehicle that carries your students. That is the direction every state is moving in, and it is what parents expect.
Layer 2: State school bus rules
States control the deadlines for older vehicles, run the command centres that receive alerts, and write school transport rules of their own. Two recent examples show where things are heading.
Maharashtra. The Maharashtra Motor Vehicles (Regulations for School Buses) (First Amendment) Rules, 2026 were notified on 16 July 2026 and cover school buses, school vans and educational institution vehicles. Among other changes, the amended rules require every school transport vehicle to carry a VLTD with a panic button, alongside GPS based live tracking, CCTV, digital attendance and automated alerts. The same rules make lady attendants compulsory for students up to Class V and gave existing vehicles three months to comply, with permits liable to suspension or cancellation after that.
Kerala. Kerala’s Motor Vehicles Department runs its own parent tracking app so families can follow school vehicles in real time. The department has pushed schools to register parents’ phone numbers on it and applies the same expectation to contract vehicles, and tracking is checked when school vehicles come in for fitness tests. Owners in Kerala can read more on our VLTD and panic button installation page for Kerala.
Other states follow similar patterns with different timelines, approved device lists and command centre setups. Because deadlines and approvals differ, it helps to check a state by state view such as our state wise AIS 140 mandate list for 2026 before you plan a rollout across branches in different states.
Layer 3: Education board guidelines
Education boards add their own conditions for affiliation. A national school board circular of February 2017, issued after a fatal school bus crash in Uttar Pradesh, made GPS and CCTV mandatory in school buses and held school management responsible for lapses, with disaffiliation possible in serious cases. Board guidelines do not usually describe panic buttons in technical detail, but an AIS 140 VLTD with emergency buttons is the standard way schools meet the GPS requirement while also satisfying transport rules.
| Layer | What it requires | What it means for your school |
|---|---|---|
| Rule 125H, CMVR | VLTD with one or more emergency buttons in public service vehicles | Every hired bus and permitted van needs a working, registered device |
| VLTD Order, 2018 | Start date of 1 January 2019 for new vehicles; states set dates for older ones; check at fitness | Fitness renewal is where a missing or silent device gets caught |
| State school bus rules | Tracking, panic buttons, CCTV, attendants, parent apps (varies by state) | Often covers school owned buses and vans that the central rule does not reach cleanly |
| Board guidelines | GPS, CCTV, speed governors, trained attendant | Affiliation risk if transport safety lapses are found |
How the RTO checks it
For most school vehicles, the moment of truth is the annual fitness check. The inspecting officer is not only looking for a button on the dashboard. The officer is checking that a device is fitted, that it is registered against that vehicle, and that it is actively reporting. Records for the device are linked to the vehicle in the transport department’s systems, so a device that has stopped sending data shows up as inactive even if the hardware looks fine.
This is the single most common reason we see school vehicles run into trouble. The panic button is physically there, and the fitment certificate is in the file, but the device went silent months ago because the data plan lapsed or the wiring was disturbed during body repairs. The bus looks compliant until the day it is tested, and then the renewal is held up during the busiest weeks of the school calendar.
How Many Panic Buttons Does a School Bus Need?
The central rule says “one or more” emergency buttons and leaves the exact number open. Some state procedures and command centre programmes specify more detail for larger passenger vehicles, so always check what your state transport department or its approved device list asks for. Beyond the legal minimum, the right number depends on the length of the bus and on who needs to reach a button quickly.
All the buttons in a vehicle connect to the same VLTD. Adding a button does not mean adding a second tracking device. It means running another wired input to the same unit, so every alert carries the same location, vehicle number and time.
| Vehicle | Practical minimum | Why |
|---|---|---|
| School van (up to about 12 seats) | 1 button, 2 if an attendant rides | Driver must reach it; the attendant usually sits in the rear |
| Mini bus (about 20 to 32 seats) | 2 buttons | One at the driver, one at the attendant seat near the door |
| Full size bus (40 seats and above) | 3 or more buttons | Driver, attendant, plus at least one in the middle or rear passenger area |
A useful test is to stand at the back of the bus and ask: if the attendant were at the front dealing with an injured driver, could a responsible senior student at the back raise an alert within a few seconds? If the answer is no, the bus needs another button. On long buses that run with standing children during peak routes, this matters even more because the aisle can become impassable.
Who Presses It, and Where Each Button Should Go
Button placement is where good intentions often fail. A button mounted in the wrong spot is either unreachable in an emergency or pressed by accident twice a week. The rule asks for the button at a conspicuous position. For a school bus, conspicuous has to be balanced against the fact that small children are curious and will press anything red.
| Who | When they press it | Best position |
|---|---|---|
| Driver | Accident, threat on the road, breakdown in an unsafe spot, sudden illness | Within reach of the seated driver without leaning, away from the switches used every day |
| Attendant | Medical event, driver unwell or impaired, misconduct, unauthorised person | Beside the attendant seat near the door, reachable while standing or seated |
| Older students | When both adults are unable to act | Mid or rear wall, at adult shoulder height, with a protective flip cover |
Placement principles that work in practice
1. Reachable in seconds, not hidden
The person who needs the button should reach it without unbuckling, standing on a seat or moving past others. Fit the driver’s button where the hand naturally rests, not under the dashboard where only the installer can find it.
2. Protected from accidental presses
Use buttons with a flip cover or a recessed design, especially in the passenger area. A deliberate two step action (lift the cover, press the button) stops most false alarms without slowing a real one.
3. Height chosen for the age group
On buses that carry only primary students, mount passenger area buttons above the reach of a seated small child. On buses that carry secondary students, mount them where a standing teenager can reach easily. Mixed buses need both considerations, which is another reason to keep the attendant’s button close at hand.
4. Clearly labelled in two languages
Label each button “Emergency / SOS” in English and the local language, with a short line such as “Press only in an emergency”. Children follow instructions they can read.
5. Wiring that survives a school bus life
School buses get washed, repainted and reupholstered more often than most fleets. Route button wiring through protected channels, avoid seat frames that get removed, and record the routing so a body shop does not cut it by mistake.
6. Visible confirmation for the person pressing
Where the device supports it, a small light or buzzer that confirms the alert was registered stops people from pressing repeatedly, and reassures a frightened attendant that help has been called.
What Happens After Someone Presses the Button
Schools often assume that pressing the button summons the police automatically and the job is done. The reality has two parts: the official alert path set up by the state, and the operational path the school and bus operator set up themselves. Both matter.
The alert path, step by step
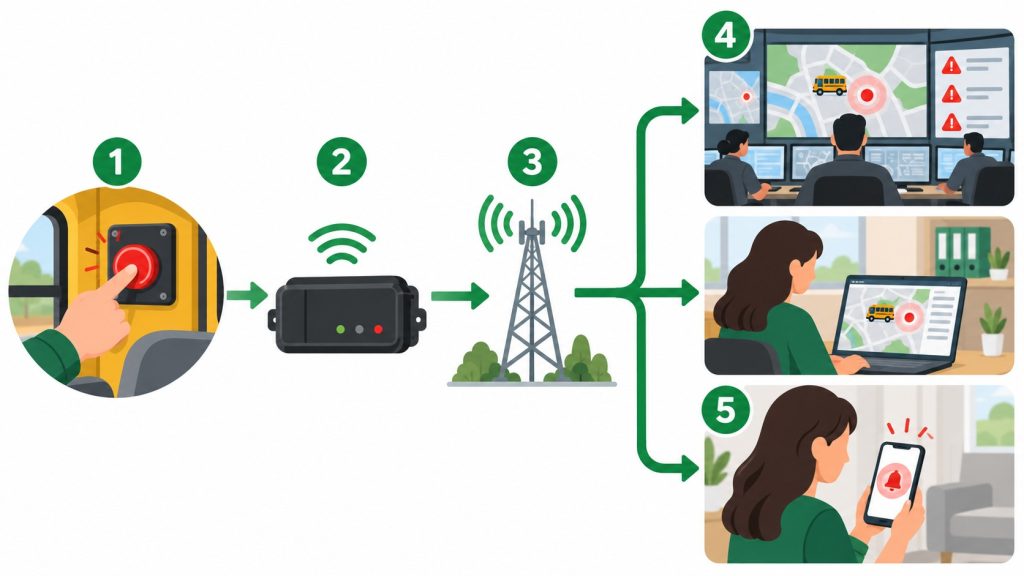
Step 1: The button signals the tracking device
The press closes a circuit on the VLTD’s emergency input. The device marks the event as an emergency and attaches the vehicle identity, time and current GPS position.
Step 2: The device sends the emergency alert
Over the mobile network, the device sends the alert to the destinations configured for it. Under the central order, states publish the server and SMS gateway details of their emergency response systems so that devices can route alerts there. The device also reports to the backend platform used by the operator.
Step 3: The control room and the school transport team are notified
The state command centre sees the vehicle and location. On a fleet platform such as Navionyx, the school’s transport team gets the alert on screen and on the phone, with the bus on a live map, so the school does not have to wait for a call from anyone.
Step 4: Live tracking continues until the alert is closed
The bus keeps reporting its position so responders can follow it if it is moving. The alert stays open until someone with authority checks the situation and closes it.
Step 5: The event is logged
Time of press, location, who responded and how it was closed become part of the vehicle’s record. That log is valuable for parents, for the school’s own review, and for any later inquiry.
The part no regulation writes for you: the school’s response plan
The state control room can see an alert, but it does not know which children are on the bus, which parents to call, or that the attendant on route 7 is new this week. Only the school knows that. A panic button without a response plan is like a fire alarm in a building where nobody knows the exit routes.
A workable plan fits on one page and answers five questions:
✓ Who receives the alert first? Name a primary and a backup person for morning and afternoon routes, including weekends for activity trips.
✓ How fast do they act? Set a target, for example a call to the driver or attendant within two minutes of the alert.
✓ What if nobody on the bus answers? Decide in advance when to call 112, when to send the nearest school vehicle or staff member, and who coordinates with the police.
✓ Who informs parents, and what do they say? One calm, accurate message from the school is far better than thirty parents hearing different versions from their children.
✓ How is the alert closed and recorded? Note what happened, who responded and whether any follow up is needed, such as a medical check or a driver review.
Print the plan, give a copy to every driver and attendant, and keep the route wise contact sheet updated. Schools that do this treat the panic button as part of a system. Schools that skip it end up with a working device and a confused response.
False Alarms: Why They Happen and How to Handle Them
Every school that installs panic buttons will see some false alarms. That is not a reason to hide the buttons or disconnect them. It is a reason to understand where false alarms come from and design them out.
The usual causes
✓ Curious young children pressing an uncovered button within reach of their seats.
✓ Bags, umbrellas or elbows knocking a button mounted too close to a seat edge or the aisle.
✓ Cleaning staff pressing buttons while washing the interior, or water entering a poorly sealed switch.
✓ Wiring faults after body work, where a damaged cable creates a false emergency signal.
What to do when one happens
Treat every alert as real until someone on the bus confirms it is not. Call the driver or attendant, confirm everyone is safe, and close the alert with a note that it was accidental. If the state control room calls, explain calmly and give the vehicle number. Do not scold the child in a way that teaches the whole bus that pressing the button gets you in trouble; you want a real emergency to be reported without hesitation.
Then look at the pattern. If the same bus produces repeated false alerts from the same button, the fix is usually physical: move the button, add a cover, or repair the wiring. A monthly review of alert logs, which takes ten minutes on a fleet dashboard, catches these problems before they wear down everyone’s trust in the system.
A short talk at the start of each term works better than any sign. Show students the button, explain when to use it, tell them nobody will be punished for pressing it in a real emergency, and explain that pressing it for fun pulls people away from children who might really need help.
Contract Vans, Hired Buses and Private Vehicles on School Routes
Most Indian schools do not own all the vehicles that carry their students. A typical mix includes school owned buses, buses hired from a transport contractor, vans run by individual owners who collect fees directly from parents, and some parents who drop their own children. Each needs a different conversation.
Buses hired from a contractor
These are the clearest case. The contractor’s buses are public service vehicles and must carry a working VLTD with emergency buttons. The school’s job is to make it a contract condition and to verify it. Ask for the fitment certificate for each vehicle, confirm the device is reporting, and get access to live tracking for your transport team. Add a clause that a device found inactive must be fixed within a fixed number of days, and that the vehicle cannot run school routes until it is.
Independent van owners
Vans that parents arrange directly are the grey zone of school transport. Many schools say these vehicles are not their responsibility because parents pay the owner directly. In practice, parents see a van stopping at the school gate every day and assume the school has checked it. Several state rules and child rights bodies have also made clear that schools cannot fully step away from the safety of children who arrive in vehicles on regular school routes.
A sensible middle path is to maintain a register of vans that regularly carry your students, ask owners to share their permit and VLTD fitment certificate, and tell parents clearly which vans are on the register. In states with strict school vehicle rules, such as Maharashtra after the July 2026 amendment, school vans are covered directly and owners will need the device anyway.
Private cars and informal pooling
A parent driving their own child in a private car does not need a panic button. The situation changes when a private vehicle starts carrying several unrelated children for money. That vehicle is now operating as a transport service without the right permit, and it will not have the VLTD, insurance cover or fitness checks that a permitted vehicle carries. Schools should discourage this openly and give parents a list of compliant options instead.
Installation Checklist for Schools
Most of the delay in a school bus panic button rollout comes from paperwork and coordination, not from the fitting itself. A single vehicle installation usually takes a few hours. Getting thirty buses from three contractors done before the fitness renewal season takes planning. Here is the checklist we use with school fleets, split into before, during and after.
Before installation
1. Build the vehicle list
For every vehicle that carries your students, record the registration number, owner, permit type, seating capacity, registration date and fitness expiry date. Note whether a VLTD is already fitted and whether it is reporting.
2. Sort vehicles into three groups
Group A has a working device and needs only a check and button review. Group B has a device that is fitted but silent and needs renewal or repair. Group C has nothing fitted and needs a full installation. This sorting alone often shows that the real work is smaller, or larger, than expected.
3. Decide the number of buttons per vehicle
Use the vehicle size and the age group it carries. Write the agreed layout down so every installer follows the same standard across the fleet.
4. Collect documents
Keep the registration certificate, permit, and owner details ready for each vehicle. Device registration against the vehicle needs accurate chassis and engine numbers, and a single wrong digit can hold up activation.
5. Check the device and installer
Confirm that the device is AIS 140 certified and accepted in your state, and that the installer can register and activate it on the state system. Our article on AIS 140 versus non AIS GPS trackers explains why an ordinary tracker with an SOS key is not a substitute.
6. Schedule around the timetable
Book installations during weekends, holidays or the gap between morning and afternoon routes. Fitting the whole fleet in a short window before the academic year starts avoids pulling buses off routes mid term.
During installation
7. Have someone from the school present
At least for the first two or three buses, the transport manager should be there to approve the button positions. Changing a position later costs more than getting it right once.
8. Test every button before the bus leaves
Each button should produce an alert that shows up on the platform with the correct vehicle number and location. Coordinate the test with the installer so the state control room knows it is a test.
9. Fix labels and covers on the spot
Bilingual labels and flip covers should go on during installation, not as a later task that never happens.
After installation
10. Collect certificates for your audit file
Keep a digital and printed copy of the VLTD fitment certificate for every vehicle. It records the device and the emergency button fitment, and it is what inspectors, boards and auditors ask to see.
11. Set up dashboard access
Give the transport manager and the backup contact login access and phone alerts. Check that alerts arrive on their phones, not only on a desktop that nobody watches during early morning routes.
12. Brief drivers and attendants
Walk each driver and attendant through their button, the response plan and the number to call after pressing. Record who was trained and when.
13. Put renewal dates in the calendar
The device’s data and server plan, the vehicle’s fitness date and the permit dates should all sit in one calendar with reminders well ahead of time.
Who Is Responsible for What
Panic button problems often fall through gaps between the school, the vehicle owner and the installer, with each assuming someone else is handling it. Writing down responsibilities closes those gaps.
| Party | Responsible for |
|---|---|
| Vehicle owner | Fitting a certified device, keeping it working and reporting, renewing the data plan, presenting it at fitness checks |
| School management | Verifying compliance of every vehicle on its routes, the response plan, staff training, parent communication, audit records |
| Installer or device provider | Correct installation, registration and activation on the state system, issuing the certificate, repair and renewal support |
| Driver and attendant | Knowing their button, using it correctly, reporting faults or damage the same day |
| Transport department | Running the command centre, checking fitment and working status at fitness, enforcement |
If your school owns its buses, the school is both the owner and the management in this table. That makes the school responsible for every row except the transport department’s. It is worth naming one person, usually the transport manager, as the owner of panic button compliance for the whole fleet.
Keeping Panic Buttons Working Through the School Year
A panic button installed in June and never checked again will not be reliable by February. School buses live hard lives: daily washing, monsoon water, constant vibration on rough roads, and frequent repairs. A simple upkeep routine keeps the system ready.
| When | What to check |
|---|---|
| Every day | Dashboard shows every bus on the map during route hours; a bus that is not reporting is flagged before the evening route |
| Every month | One coordinated test press per vehicle; review of alert logs and false alarms; physical check of covers and labels |
| Start of each term | Student briefing; refresh the response plan and contact sheet; brief any new drivers and attendants |
| After any body or electrical repair | Test every button before the bus returns to its route |
| Before fitness renewal | Confirm the device is active, the plan is valid, and the certificate is on file at least a month before the due date |
The button itself has no battery to charge. What expires is the tracking device’s data connection and server subscription. When that lapses, the device cannot send location or emergency alerts, and the bus shows as not reporting. Schools should treat this renewal exactly like insurance: a fixed date, an owner, and a reminder well ahead of time.
Beyond Compliance: Sharing Live Bus Location With Parents
Once every bus has a working AIS 140 device, the school already has the hardest part of a parent tracking system in place. The same device that sends emergency alerts also reports the bus position throughout the route. Turning that into parent visibility is mostly a matter of software and process.
Regulators are pushing in this direction too. Kerala’s Motor Vehicles Department offers a parent tracking app for school vehicles registered against parents’ phone numbers, and Maharashtra’s 2026 rules include a digital safety monitoring system with parent access through a mobile app. Parents increasingly expect it, and schools that offer it field far fewer anxious calls when a bus is running late.
What good parent visibility looks like
✓ Live location of the child’s bus only, not the whole fleet, so privacy is protected.
✓ Arrival alerts when the bus is a few minutes from the stop.
✓ Delay messages from the school when a route is disrupted, instead of silence.
✓ A clear rule on emergencies: parents are informed by the school, with accurate information, rather than through raw alerts on their phones.
That last point deserves a moment. We generally advise schools not to push raw panic alerts to every parent on the bus. A false press would create thirty frightened families in seconds. The better design is that the school transport team receives the alert, checks it, and then informs the affected parents with facts. Parents still get transparency, and the school stays in control of a sensitive moment.
Many schools combine the VLTD with cameras for a complete picture of what happens on board. If you are considering that step, our article on why every school bus needs a dashcam covers cabin cameras, footage retention and parent apps in more depth. For a view of how tracking, alerts and route monitoring fit together for schools, see our school transport solutions.

Frequently Asked Questions About School Bus Panic Buttons
Do school vans also need a panic button?
Yes in most cases. A van that carries children for a fee on a permit is a public service vehicle under the central rule, and state school vehicle rules such as Maharashtra’s 2026 amendment cover school vans explicitly. The only clear exception is a private car carrying the owner’s own children. Even where a state is slow to enforce, a van that carries other people’s children without a working tracking device and emergency button is a risk no school should accept on its routes.
Who receives the alert when the button is pressed?
The alert goes to the state’s emergency response system and to the operator’s tracking platform. Through the platform, the school can route it to its transport manager and a backup contact on their phones. Parents should hear from the school after the alert is checked, rather than directly from the device.
What happens if a child presses the button by mistake?
The transport team calls the driver or attendant, confirms that everyone is safe, and closes the alert with a note. If the control room calls, the school explains that it was accidental. There is no penalty for a genuine mistake. If one button keeps producing false alerts, the fix is to move it, add a cover, or check the wiring.
How often should school bus panic buttons be tested?
A coordinated test press once a month per vehicle is a good rhythm, plus a test after any repair that touches the wiring and a full check before the fitness renewal. Agree the testing method with your installer so test alerts are handled correctly by the state control room.
Conclusion: A Button, a Device and a Plan
A panic button in a school bus is often treated as one more item on a compliance list, something to fit before the fitness test and forget. The schools that get the most from it think about it differently. They see three parts working together: buttons placed where the right people can reach them, an AIS 140 tracking device that is registered and reporting every single day, and a response plan that tells their own team exactly what to do when an alert arrives.
The rules are moving in one direction. Central law already requires a VLTD with emergency buttons in public service vehicles, and states like Maharashtra now require it in every school transport vehicle. Getting ahead of that is not difficult. Build the vehicle list, sort what is working from what is not, agree a button layout, install and test, keep the certificates on file, and put the renewals in the calendar. Do that once, carefully, and every bus on your routes is ready for the day a child, a driver or an attendant needs help.
This article was researched and written with AI assistance and reviewed by the Navionyx team. Rules and deadlines differ by state and change over time. Confirm the current requirements with your state transport department before planning a rollout.
Getting your school buses ready?
Message us your bus and van list. We will check what is already compliant, what needs renewal, and share a plan and quote for panic button and VLTD installation across your fleet.
Send Us Your Bus List